User's Guide
Updated February 25, 2026
Computer (PC) under control OS Windows 7/8/8.1/10 with installed .NET Framework 4.6.2 or above (already installed in most modern Windows), and Device running Android 7.0 and above. Support for older Android versions is possible but not guaranteed.
Links:
.NET Framework 4.8 for Windows 7 SP1, 8.1 or 10
.NET Framework 4.6.2 for Windows 8 and 7 without SP1
Visual C++ and this update (Optionaly, if you have an error)
The program does not start. Method not found: "!!()[] System.Array.Empty()". .NET Framework required.
Install the .NET Framework 4.8 for Windows 7 SP1, 8.1 и 10 or .NET Framework 4.6.2 for Windows 8 and 7 without SP1. If on the Windows 7 SP1 is .NET Framework can't install try to install KB3033929 update (for x86 here).
The program cannot be started because api-ms-win-crt-string-l1-1-0.dll is missing on the computer.
Install Visual C++ and this update (select the version for your OS).
adb.exe - Application Error. The Application was unable to start correctly (0xc000007b)
Install VC++ and the update from the previous answer.
The program hangs while connecting. Error "The device does not respond for a long time".
Your device may be in sleep or power saving mode. Try to unlock the screen and connect again.
Problems connecting the device.
Try to revoke the USB debugging authorizations in Developer settings on the device.
When the device is connected, the program does not respond. Always DISABLED status.
See the Drivers chapter.
The screen control (scrcpy) does not work
Check that all required options are enabled in the Developer Settings. On Xiaomi, you need to enable the USB debugging (security settings) option.
ACBridge is not installed. [Error]: Cannot to install ACBridge.
If in the menu for the Developers of your device there is an item Install applications via ADB - enable it. If that doesn't help and the rest of the program functions (disabling, saving, etc.) work correctly, then copy the com.cybercat.acbridge.apk file from the adb folder to the device and try to install it manually through the file manager. In Settings - Applications, find ACBridge and give it permission to access memory. Restart the program. You don't need to run ACBridge.
The program installs a service application on my device ... Is it safe?
Yes, it is completely safe. ACBridge application does NOT have any permissions other than storage access. Even internet access. This means that this application cannot pose a threat to your device.
Permission Manager. Can't grant/revoke permits. Why?
You can only grant permissions that are allowed by the Android security policy. You can only revoke permissions that have been manually granted.
The size of all applications is 0.
Application sizes are not always displayed and not on each device. You can check it out by the console command: adb shell dumpsys diskstats. In the normal output must be present package names and many digits (sizes). If this is not, the command do not work and there will be no size. But you can use the Accurate Sizes option (in the Extended version) for Android 8+ devices, in this case the sizes of applications will be shown.
Android TV. There is an error 10061 when trying connect over the network.
Maybe this will help: enable usb debugging in the settings for developers. Reboot the TV. Enable the option debug via usb again.
If program does not see the device.
A driver is a set of instructions for the operating system that allows it to interact with devices. If the system does not have the correct driver installed, it will not be able to understand what device you have connected and how to work with it.
The Windows 7 and 8 users often has the ADB driver problem. ADB AppControl will offer you to install the driver automatically. If it does not work, then on this page you can find possible solutions.
Drivers are only required when connecting via USB. You can also use my new ADB AppControl app for Android, which does not require drivers or a computer.
Possible solutions:
► Use a working, proven (preferably device-native) USB cable. Connect directly to the USB ports of your computer, do not use USB hubs and extension cords.
► Make sure that Debug is enabled on the your Android device.
► Try connecting the device via USB in different modes - only charging, file transfer, MIDI, etc. (select from notification panel). On samsung (and not only) when connected, give permission to access data if device ask.
► The distinctive feature of the non-existing driver is an unknown device in the Windows Device Manager (My Computer Properties), which appears after connecting the smartphone via usb. If there is no unknown device, then the driver cannot be installed on it. In this case, try to find a way to make your system to see your device (for example change usb mode).
► How to install a USB driver for Android for 1 minute
► Samsung Driver (the old driver with Windows 7 support). Official site link (new driver).
► Driver Installer. It is usually enough. Run installer on the PC and then connect the USB cable device.
► Another installer, which can work.
► Driver for devices on the MTK (Mediatek) platform. Suitable for MTK-based Realme, Oppo, Vivo, etc.
► My installer with the driver
Download the archive with the program and unpack it to any place on the disk of your PC, for example, in D:\ADB_AppControl. Or use the official installer.
⚠️Important! It is not recommended to install the program in C:\Program Files\
If you do NOT have Windows 10 or newer, you may need to install the ADB driver, without which the program will not be able to see your device. All the information you need to solving driver problems (look to Drivers chapter).
Enable debugging on your device
Go to your Android device (hereinafter simply the Device) to Settings - About and tap several times on the Build (Build Number), until a message appears that you have become a developer. Look in the settings for Developers options (usually in the general settings list, or in the About menu).
Additional
If the settings for developers have the following options - turn them on:
USB debugging (Security settings), Debugging over the network, Installing applications via ADB, etc.
On the Vivo, Oppo, OnePlus devices - enable the "disable permission control" option.
Device connection
You can connect your device with a usb cable or via Wi-Fi wireless connection.
USB-Connection:
Connect your device via a USB cable to your PC (TVs via usb do not need to be connected!). The status will change to WAITING for allow debug. On the screen of your device, allow debug permission in the popup window and turn on the Always Allow option. The program will automatically connect to the device.
It is recommended that you use the native cable supplied with your device.
If you have Windows 7 and the program does not see your device, please refer to the following. Drivers section.
Wireless connetion:
Important! The computer and the device must be connected to the same local network (Wi-Fi) and VPN must be disabled.
For Android 11+ devices that support Wi-Fi debugging, go to the Pairing section of this guide.
Make a USB Connection, then click the Enable Wireless Debugging button located in the upper right corner of the program window and follow the on-screen instructions. Network debugging works only until the device is rebooted and after that the procedure will have to be repeated.
Connection by IP address: (requires network debugging enabled!)
For Android 11+ devices, see. section Pairing.
Disconnect the usb cable from the device.
Make sure your device and PC are on the same local Wi-Fi network.
Enter the IP address of your device and click connect. You can also select the IPs you previously connected to from the dropped-down list.
The IP address is automatically detected when the button is pressed Enable Network Debugging. You can also find it in the device settings (for examle 192.168.0.1):
For smartphones: Settings - System - About - Status - IP address.
For Android TV: Settings - About Device - Status - IP Address.
Installing the ACBridge service application
When you connect the device for the first time, the program will prompt you to install a service application that allows you to get the full names of applications and their icons. Make sure your device is not in sleep mode (unlocked screen). After installation, the data will be updated automatically every time the device is connected.
Pairing - allow you to connect your Android device wirelessly using wireless debugging. It may seem complicated the first time, but you'll quickly realize how convenient it can be.
Only Android 11+
Basic Concepts
The IP is the address of your Android device on the local (Wi-Fi) network, for example 192.168.1.101.
Port is the number that comes after the IP address. For example, in the address 192.168.1.101:35511, the port is 35511.
Important! The connection port changes each time wireless debugging is enabled. Also the wireless debugging will be disabled
automatically if not using for a few time.
Pairing
Performed once.
Step 1
On your Android device, go to Developer Options - Wireless Debugging (Wi-Fi) - Pair with Code.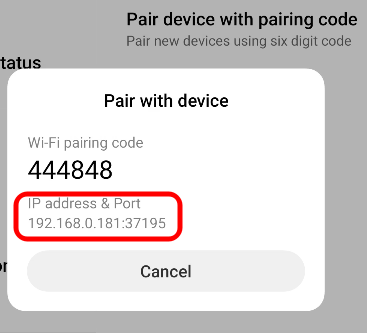
Step 2
In the ADB AppControl interface, click the pairing button. Enter the address, pairing port and code as shown in the picture. Perform the pairing.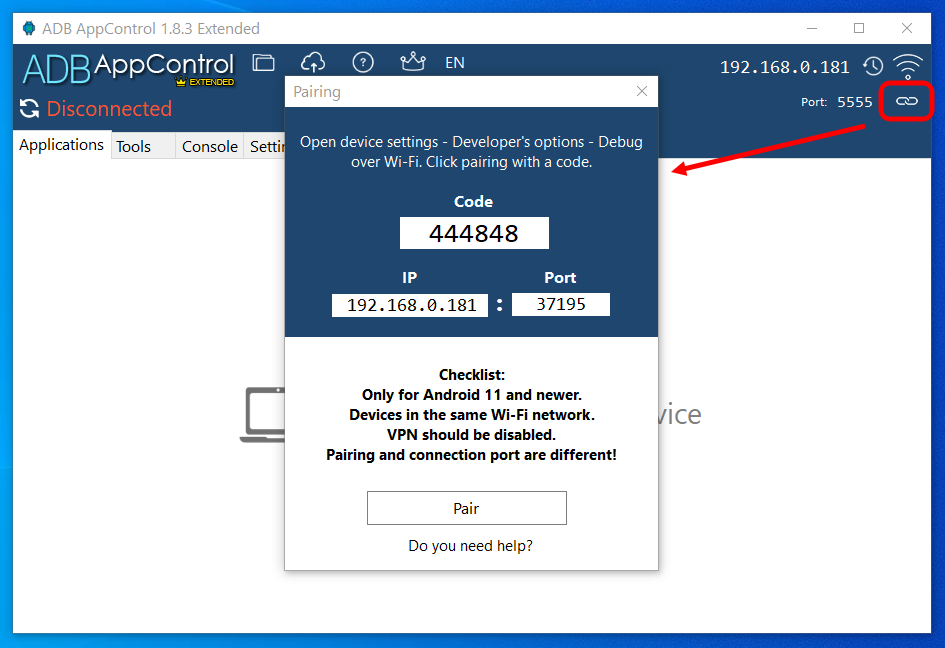
Step 3
The pairing window on your device should close by itself and the name of your computer will appear in the list of paired devices.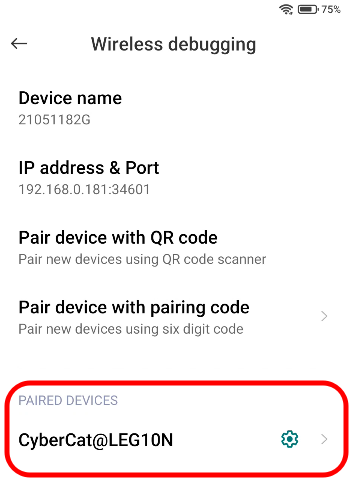
Automatic connection may occur at this point.
The paired device can disappear from the list after a while. In this case you need to pair it again.
Connection
Performed each time the device is connected.
Step 1
On your Android device, go to Developer Options - Wireless Debugging (Wi-Fi) - Enable. Memorize the IP address and port number for the connection. Pairing (connection via code) is no longer necessary! At the picture example 192.168.0.181 is an IP-address and 34601 is a Port.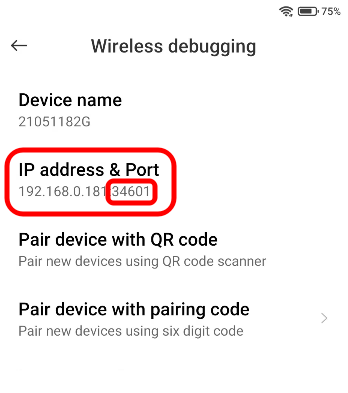
Step 2
In ADB AppControl, enter the IP address of the device and the port number for connection. Click the connect button. Note that the IP address of the device is usually static, but the port to connect to will be different each time you connect.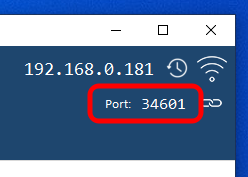
I hope this guide has been helpful to you.
⚠️ ACBridge only works on devices with Android version 6 or newer.
The ADB AppControl program can display icons and app names "as on the device". For this feature to work, you will need to install the ACBridge application. This application is developed by Cyber.Cat and comes with ADB AppControl.
Quick installation
On most devices, the program can install AcBridge automatically, when device connecting. On Xiaomi devices, you need to enable Install applications via ADB and Debugging by USB (secure settings) options in the developers settings. Also be sure installed ACBridge app has a Storage permission.
Manual installation
1) Connect your Android device to PC with usb cable.
2) Copy com.cybercat.acbridge.apk file to the device. You can find it in the folder where you installed ADB AppControl (adb folder), or download from this website.
3) Use a filemanager on your device to install apk-file. Do not run the ACBridge.
4) Go to Settings - Applications - ACBridge and grant Storage Access premission to it.
5) Connect your device to the ADB AppControl again.
After connecting to the device, the program will show you a list of installed applications. You can switch between lists by selecting the desired filter ●○.
All – shows all applications installed on the device EXCEPT disabled.
System - shows only applications installed as system ones. Disabling some system applications may make the device inoperable and require a factory reset.
User – pre-installed or user-installed applications. Disabling and uninstalling such applications is completely safe and will not affect the operation of the device.
Disabled – this list contains all disabled applications on the device. They do not appear in any other list. They cannot be launched, they do not work in the background, but all their data (photos, videos, settings, etc.) is saved. If such an application is enabled, it will be functional again as it was before it was disabled. On some devices (Samsung), applications placed in "Deep Sleep" will also be on this list.
Deleted - previously deleted system applications are shown here and can be restored (Android 8+ is required).
Mark the required applications with checkboxes (they will be highlighted in a different color). After that, right-click on the list and select one of the actions from the menu (or on the left panel):
Disable – disable (freezes) marked applications without losing data and settings. You can always find them in the Disabled list and re-enable.
Enable – enable disabled applications.
Save – saves apk (and apks splits) files of marked applications to the \downloads folder (application data is not saved!).
Uninstall – deletes the selected applications along with their data. If you want to keep the data and application cache on the device, select the Keep data option (applies to all deleted applications!). Important: when "uninstalling" system applications, they are actually removed only from the list of installed in the system and cease to function (as if disabled), but physically remain on the device. Their complete removal without root access is impossible.
Restore allows you to restore a previously deleted system application. Requires Android 8 or higher (may not work on all devices!).
To quickly find the applications you need in the list, use the Search. The search is carried out only on the selected list (All, System, etc.). Start typing part of the name of the application you are looking for and all matches will instantly appear in the list.
Installing Applications
Click Install to go to the apps installation section. Click Quick Install button to open file dialog, select the apk file on the disk and install it. You can also place your files in the \Install folder (or drag and drop them into the program window) so that they appear in the list. In this case, you can install more than one application at a time.
NB! Use the context menu (right click on the application) to control single app and access to additional features (Permission Manager, Data Cleaning, and others).
ACBridge
Requires andoid 6 or higher. Compatibility with older versions may be limited.
This is a service application for Android to provide data exchange between the device and ADB AppControl on a PC. It must be installed in order to be able to display application icons and their names, instead of their packages names like com.android.app. Data auto-refresh will start after the device is connected and may take some time depending on the connection method and performance. It is recommended that when connecting, make sure that the device is not in sleep mode, turn on the screen and unlock it. You can also always update the data manually by clicking the Refresh Application Data button.
Important! If your device is connected via a network, in sleep mode, or in power saving mode (the screen is locked), this may noticeably affect the update time of applications. For optimal performance, use a USB cable connection. ACBridge after installation does not appear in the launcher applications menu and does not have a user interface. You can remove it through the application manager.
Upload files to device
In the Extended Version, you can send multiple files at once!
After clicking the button, you can select the files you want to download to your device. The files will be downloaded to the Downloads directory of your device.
Auto-Permissions
There are many applications that require special permissions that can only be granted through ADB. With this option you will be able to grant such permissions automatically. Click the button, select the required application from the list (app must already be installed) and click the Grant Permissions button. Supported Apps List
Permission Manager
Right-click the required application and select Permissions from the context menu. The Application Manager will allow you to grant and revoke permissions. IMPORTANT: Not all permissions can be granted, and only manually granted permissions by the user can be revoked.
Clearing app data
Right-click on the application and select Clear data from the context menu. All data, cache, and settings for the selected application will be deleted. Only the cache clear is not possible.
Working with presets
A Preset is a text file containing a list of applications. To create a preset, select the required application in the list and click the Save preset button. In the window that appears, enter a name for the preset and add your comment (for example "Preset of useless applications by John") and click the save button. Your preset will appear in the presets folder.
You can also Load a preset - select an existing preset file and all applications recorded in it will automatically become checked in the list. The message after that will show how many applications are in the device list / of how many applications from the preset have been marked. Optimally apply the preset on the All list. You can also apply several presets in sequence.
Console
On the Console tab, you can enter any adb commands. Use ctrl + mouse wheel to zoom in / out the console window. You can use the Quick Commands menu - to add a command to your favorites, write it in the console and press + to add it to the list. Fast commands are stored in the adb\fastcmd.cfg file.
Copy console log - copies the contents of the console to the clipboard. Use to insert into a forum post.
Clear Console - Clears the console screen.
Logcat - hover the mouse to open the logging menu. Check the boxes you need to make the logcat template appear on the command line. Double click the logcat button for quick launch. To stop logging, click Stop logcat - the log will be saved to a file, and the device is disconnected from the network. Use the logcat command without redirecting output to a file (>) to open it in a separate window in real time.
Press ☼, to change the contrast of the console.
Click on > to hide the sidebar and expand the console
SHELL - the program supports the shell command in a separate window - press the Shell button or write 'shell' in the console.
Controlling the device via Scrcpy.
The third-party application Scrcpy allows you to control your device remotely. Click Screen Control button and follow the program instructions. During installation, the Scrcpy application will be unpacked to the \scrcpy folder. You can update the application yourself in this folder by replacing its files. On Xiaomi devices in the developers settings you need to enable the Debugging via usb (security settings) option. Important: scrcpy may not work with some devices and with landscape screen orientation. You can pass on your suggestions and comments to developer.
Change screen resolution
Decreasing of the screen resolution can improve your device's performance and battery life. Please be careful - on some devices the incorrect resolution may cause to problems.
Hide status bar icons
The ADB AppControl allow you to hide the status bar icons. May not work on some devices.
Reboot device
Press button and select the mode to reboot your device.
The new and effective feature will allow you to get rid of most of the unwanted apps and bloatware on your device.
This feature is still under further development and is available as part of open testing.
Why disable apps?
Everyone knows such "monsters" as Facebook, but there are many other applications on your devices that run in the background, are badly optimized and send your personal data somewhere. By disabling unwanted applications, you can achieve the best result of the autonomy of your device, free up RAM and protect your personal data.
How does it work?
The Wizard works based on statistics of the disabled applications and uses special algorithms to provide you with several cleaning steps. You need to select the desired level to get a list of applications that are recommended to be disable on your device. After that, you will be able to choose which applications you wish to disable/remove. The application databases will be regularly updated, and the algorithms will be improved to maximize the effectiveness of the Wizard.
Interface settings
The Extended Version settings menu allows you to customize the appearance of the program for yourself. Now, you can adjust the transparency, font size and icon size. In the future, based on user feedback, new, popular settings will be added. The settings will be applied after clicking the Save Settings button.
Process manager
It will show you a list of the running processes and the percentage of the RAM they use. Some of them can have a negative impact on the performance of the device and its autonomy. You will have the opportunity to stop this application from the context menu.
Dark theme
Paints the interface in dark colors that will delight your eyes in the evening.
Accurate application sizes (Android 8 or above required)
After enabling this option, the sizes of applications will be downloaded using the AcBridge application, each time the data is updated. You need allow the PACKAGE_USAGE_STATS permission to the ACBridge application (you can do this via ADB AppControl).
Auto update data
Disable this option if you DO NOT want to wait for the program to automatically receive application data via ACBridge when the device is connected. This is convenient for users who work a lot with different devices, or for those who have connection problems. In all other cases, it is recommended to leave this option enabled.
Show application icons
Disabling this option will hide the icons in the application list. Since the icons will no longer be downloaded from the device, the data update rate will increase.
Saving the icon cache
This is a special mode of operation of the program with application data, which is fundamentally different from the work of the basic version. If this option is enabled, then when the device is connected for the first time, the icons of all installed applications are downloaded to the PC and saved to the cache. Each time you connect this, or other devices, the program will load only those icons that are not in the cache. This allows you to noticeably increase the speed of the program while connecting to a device, but may lead to the fact that the program displays icons from different devices that differ in style and shape. If cache saving is disabled, the program works normally, loading icons for all applications every time you connect - it takes more time, especially over the network, but the appearance of the icons always matches the connected device. This option is disabled by default and it is recommended to enable it only if you are need working fast, or experiencing problems with the speed of connecting devices and updating application data.
History of IP addresses
The program will remember the IP addresses and names of the connected devices and you can quickly connect to them by selecting the one you need in the drop-down list, without the need for manual typing (click on the history icon next to the IP address). This is very convenient if you have more than one Android device. The history can always be deleted by clicking the Clear History button.
Use system adb (from %PATH%)
The program will use adb installed on the system. Do not enable this option unless you know why.
Stop adb when exiting
If this option is disabled, the program will not stop the adb server when it closes. This is useful when adb is used by other applications, such as Android Studio and the connection is dropped when the program is closed. Can only be disabled if the Use system adb option is active.
Silent mode (no confirmation)
Advanced users can disable warning and confirmation windows before operating an action on applications.
Sorting
Click on a column heading in the list to sort applications by name, package name, or size (if available). Press M to show the marked applications.
Other possibilities
You will be able to send more than one files when using the Send File function. You will also be able to add and apk to the installation list by dragging the file onto the program window. And, of course, you will no longer see donation reminders.